February 28, 2015

CT Freek's Creations: "Irish Charm" Tutorial


This Tutorial was written by me, any resemblance to another tutorial is completely unintentional. 
I am using Photoshop CS5 for this tutorial.
Tube
Happy Beer by Elias Chatzoudis. You can find it in his personal store and must
have a valid license to use it. 
Scrap Kit
"Irish Charm" by Freek's Creations
Font
AuldMagick

Let's get started. 
Open a new canvas 851x315.
Now open the Frame and drag into your blank canvas. 
 Re-size to your liking.
Duplicate it and then flip horizontally, position opposite of the original frame. 
Merge them.
 Use your magic wand tool to select the inside of the frames and then 
Select>Modify>Expand....6.
Create a new layer under the frames and then create a gradient with the colors #f09441 & #19bc62.
Fill inside the marching ants.
Now Bring in your close up and position behind the frame. 
Duplicate and move position each in one frame together. 
Merge Down. 
Duplicate the merged layer and place behind the other frame. 
Select>Inverse, and then hit delete on your keyboard. 
Duplicate each merged close up layer and then merge them into a single layer.
Select>Inverse and then Filter>Blur>Gaussian Blur...6. 
Then Select None. 
Blending mode on blurred layer- Screen
Blending mode on original close up- Soft Light
.Bring in your tube and re-size and position to your liking. 

Now time for the elements: 
Balloons_2
Banner
Cake
Calender
Coin
Flag
Flower
Flower_2
Harp
Hat
Rainbow
Ribbon_3
Whiskey

place them to your liking and then use the drop shadow on them like this, including the tube: 


Add your copyright and then it's time to do the  name. 
I used the font AuldMagick at 95 px. with the color black. 
Then I added Stroke like so: 


Then I added drop shadow to it like I did to the other elements. 
And that's it! TY for looking at my tutorial! 

post signature

CT Foxy's Designz: "Lucky You" Tutorial

This Tutorial was written by me, any resemblance to another tutorial is completely unintentional. 
I am using Photoshop CS5 for this tutorial.
Tube
  Ted Hammond 45-1
Scrap Kit
St. Patty's Day by Foxy's Designz
Font
FTU font- Scurlock
Mask
RR_MaskSet39_Mask1
Lets get started! 
Open up new canvas at 650x650. 
Open up your tube and position to your liking.
Open up Frame7_FD.
Now open up Paper12_FD
Select the inside of your Frame7_FD with your magic wand, and then 
Select> Modify> Expand...7.
Select>Inverse and then hit delete on your keyboard.  
Time to add the elements: 
Element7_FD
Element9_FD
Element12_FD
Element13_FD
Element15_FD
Element17_FD
Element19_FD
Element23_FD
Element25_FD
Element26_FD
Element27_FD
Element32_FD
Element35_FD
Element42_FD
Element44_FD
Element45_FD
Add your drop shadows to all layers but your tube like so: 
Use this drop shadow for your tube:
Now add your copyrights and then it's time to add the mask. 
I used the mask I stated above with the Paper14_FD. 
Now time to add the font! 
I used the font Scurlock at 72 px. with the color black.
I then used the Pattern Overlay- Leaves. Scale- 1 at 100%
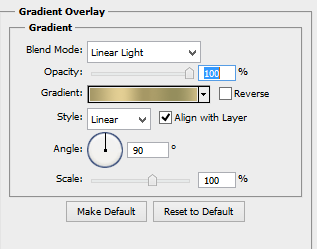
Create a Gradient like so: 

And use it with Gradient Overlay set at:

 
I did a Bevel and Emboss like so: 
And then the drop shadow as I did on the other elements. 
That's it!
Thank you for stopping by to check out my tutorial and I would love to see your results! 


post signature

February 26, 2015

CT MellieBeans: "Violet Sunshine" Tag Showoffs

Got a tag and timeline banner today made with a kit by MellieBeans called "Violet Sunshine". You can get this beautiful kit at Mystical Scraps!


Here's what I made with it: 


post signature

February 23, 2015

CT Pink Paradox Productions: "Wee Bit Irish" Tags + Snags

Got some tags today made with a new St. Patrick's Day themed kit from Pink Paradox Productions called "A Wee Bit Irish". Grab it in her store on sale!


Here are the tags I created with it: 


And now for some snags: 


post signature

February 20, 2015

PTU "Shake Your Shamrocks" Tutorial


This Tutorial was written by me, any resemblance to another tutorial is completely unintentional. 
I am using Photoshop CS5 for this tutorial.
Tube
Sexy Patty by Elias Chatzoudis
Scrap Kit
Shake Your Shamrocks by Creative Scraps by Crys 
Font
FTU font- Kells
Template
Template 506 by Millie's PSP Madness
Mask
MPM_Mask22

Lets get started! 
Open up your template and resize the largest side to 650. 
Bring in your close up and bring down above the Layer 3. 
Duplicate and position that above Layer 4. 
Hold down ALT as you click between the layer and the close up. Do the same for the 
original and Layer 3, so that they are cropped inside the circles. 
Duplicate the close up again, and drag so it is positioned above the Layer 5. 
Position to your liking, duplicate, flip horizontally, and then position to where there are no empty spaces inside the layer. 
Merge with the first layer and then hit ALT on your keyboard as you click between the template 
layer and the merged close up. 
Now you will want to create a gradient, I made my first one like so: 


With the colors #b4ce2b and #86639d.
Select the inside of your Layer 5 of the template with your magic wand 
and put your gradient across it. 
Now duplicate the merged close up layer. 
Filter >Blur > Gaussian Blur...6. 
Make that layer black and white and then make it have Screen for the blending mode. 
For the bottom layer, Luminosity blending mode. 
Now go back down to your Layer 3 of the template and create another gradient 
the same way as before but using the colors #f6ea5a and #445f0e.
magic wand and follow the steps as before, but don't make the duplicated layer
black and white.  
Duplicated layer- Screen blending mode
Main layer- Soft Light and lower opacity to 65%. 
Do the same to Layer 4. 

Now add your tube layer to your liking. 
Time to add the elements: 

SYS_Element_5
SYS_Element_8
SYS_Element_9
SYS_Element_11
SYS_Element_26
SYS_Element_30
SYS_Element_31
SYS_Element_32
SYS_Element_33
SYS_Element_38

Add your drop shadows to all layers but your tube like so: 


Use this drop shadow for your tube:

Now add your copyrights and then it's time to add the mask. 
I used the mask I stated above with the SYS_Paper_3. 
Then I smooshed (yes that's a word LOL) it down to fit the canvas... and then duplicated it. 

Now time to add the font! 

I used the font Kells at 60 px. with the color #b6d02f.
Then I made a stroke around it with black at 65% opacity. 
I did a Bevel and Emboss like so: 


And then the drop shadow as I did on the other elements. 
That's it!

Thank you for stopping by to check out my tutorial and I would love to see your results! 

post signature

February 15, 2015

PTU "You & Me" Tutorial

This Tutorial was written by me, any resemblance to another tutorial is completely unintentional. 
I am using Photoshop CS5 for this tutorial.
Tube
"Cute Helen" by Stan Dudin
Scrap Kit
"Rustic Rendezvous" by Pink Paradox Productions
Font
Dynalight
Mask
WSL_250 (download the bulk file on the right of her blog)
Let's get started. 
Open a new canvas 650x650.
Now open the Rustic Rendezvous Frames (20) and resize to your liking.
Drag into your blank canvas. 
Now open Rustic Rendezvous Paper (4) and resize to 600x600, 
drag into your canvas behind the frame. 
Use your magic wand tool to select the inside of the frame and then 
Select>Modify>Expand....20.
Select>Inverse, and then hit delete on your keyboard. 
 Now bring in your tube and position to your liking above the other layers. 
Now time for the elements: 
Rustic Rendezvous (8)
Rustic Rendezvous (9)
Rustic Rendezvous (23)
Rustic Rendezvous (24)
Rustic Rendezvous (33)
Rustic Rendezvous (51)
Rustic Rendezvous (52)
Rustic Rendezvous (54)
Rustic Rendezvous (57)
Rustic Rendezvous (60)
Rustic Rendezvous (64)
Rustic Rendezvous (71)
Rustic Rendezvous (77)
Rustic Rendezvous (93)
Rustic Rendezvous (98)
Rustic Rendezvous (99)
Rustic Rendezvous (113)
Rustic Rendezvous (124)
Rustic Rendezvous (126)
Rustic Rendezvous (129)
Rustic Rendezvous (134) with stroke #aad3d4 at 2 px. 
Rustic Rendezvous (140)
Rustic Rendezvous (145)
place them to your liking and then use the drop shadow on them like this, including the tube: 
Now time for the mask. 
I used Rustic Rendezvous Paper (30) with the mask from Wee Scotts Lass. 

Add your copyright and then it's time to do the  name. 
I used the font Dynalight at 72 px. with the color #de5d8e. 
Then I added Stroke like so: 

 and then Bevel & Emboss like so: 
Then I added drop shadow to it like I did to the other elements. 
And that's it! TY for looking at my tutorial! 
post signature

February 13, 2015

CT KnC Scrapz "Valentine Love" Tag + Snags

Made a tag today featuring an amazing kit by KnC Scrapz called "Valentine Love". 
It's beautiful and sensual elements and papers are just what anyone needs for a lovely romance themed tag. Grab it in her personal store HERE

Here's what I made with it:

And now for some snags: 


Thanks for stopping by!
post signature

February 5, 2015

CT Foxy Designz "Loving Moments" Tags + Snags

Got some tags and snags today made with the soft and sweet kit by Foxy Designz called "Loving Moments". Check it out in her store HERE and the other stores she sells in. 


Here are my creations with "Loving Moments:

And last but not least, here are the snags for ya: 


Thanks for stopping by my blog!


post signature