Showing posts with label Creative Scraps by Crys. Show all posts

November 15, 2015

PTU Tutorial: Autumn in the City


This Tutorial was written by me, any resemblance to another tutorial is completely unintentional. I am using Photoshop CS5 for this tutorial.
Tube 
Element from kit Scrap Kit "Autumn in the City" by Creative Scraps by Crys
 Font
Dawning of a New Day 
Mask 
DD_Mask11 


Now let's get started.
Open up a new canvas at 650x650.
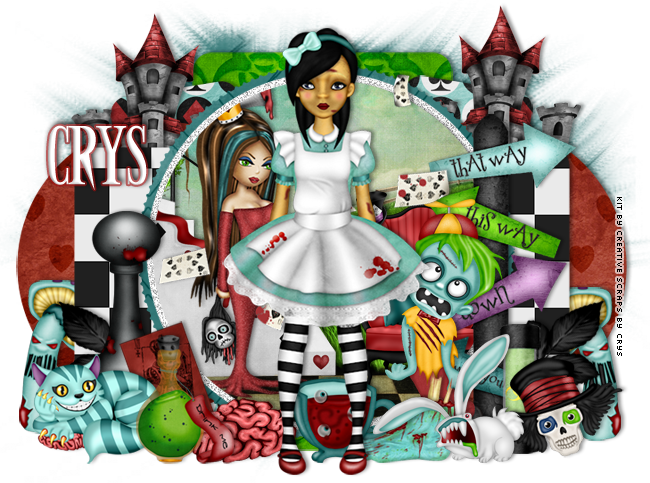
Bring in your "tube"- I used an element provided in the kit- AITC_Element_17 I didn't use any filters, and this is a pretty simple tutorial, so all you need is to drag and drop the elements, resize to your liking and then add your drop shadow.
 
First I opened up the AITC_Frame_1 and rotated to my liking. Then I brought in the AITC_Element_17 again at a larger size and then positioned under the frame. Duplicate that 3 times and position her face in the frames and then with one frame at a time, use your magic wand to select the inside, Select> Modify>Expand...3. Select>Inverse. Hit delete with your keyboard and then do it again with each remaining frame.
These are the elements I used:
AITC_Element_2
AITC_Element_5
AITC_Element_11 x2
AITC_Element_12
AITC_Element_21
AITC_Element_23
AITC_Element_30
AITC_Element_32
AITC_Element_34
AITC_Element_38
AITC_Element_42 x3
AITC_Element_43 x2
AITC_Element_44 x2
AITC_Element_51 x2
AITC_Element_52

I used a drop shadow like so:


Now for the mask!
I opened AITC_Paper_1 and resized it to 650x650.
Then I opened up the mask by Dee and used my Add Layer Mask button at the bottom of the layers box. 
After that I rasterized it and dragged it over to my tag canvas. 
Rotate to your liking and then bring down to the bottom layer. 

For the name I used the font Dawning of a New Day at 72 px. in white.
Then I used stroke and picked the color from the leaf on the frame at 2 px and 90 opacity.
Then I did the drop shadow like above.

Add your copyright and there you go! 
You're all done! 


May 25, 2015

PTU "Tiki Party" Tutorial


This Tutorial was written by me, any resemblance to another tutorial is completely unintentional. 
I am using Photoshop CS5 for this tutorial.
Tube
53-2 Pinup Toons available at CDO
Scrap Kit
"Beach Luau" by Creative Scraps by Crys
Font
Lemondrop
Mask
MPM_mask17

Now let's get started. Open up a new canvas sized 650x650. 
Now open up your tube in the canvas and resize to your liking. 

I didn't use any filters in this tutorial so it's all about placing the elements to your liking. 
The elements I used are: 

BL_Element_1
BL_Element_2
BL_Element_4
BL_Element_6
BL_Element_9
BL_Element_10
BL_Element_11
BL_Element_15
BL_Element_18
BL_Element_23
BL_Element_29
BL_Element_30
BL_Element_33
BL_Element_34
BL_Element_35
BL_Element_36
BL_Element_37
BL_Element_41
BL_Element_42
BL_Element_43
BL_Element_46
BL_Element_48
BL_Element_50

I then applied a drop shadow to all of the above like so: 


Now add a drop shadow to your tube like so: 


Now time for the mask. I used the mask by Millie's PSP Madness - MPM_mask17 with 
paper BL_Paper_1. I stretched it out a little to reach the top of the tag, so the sun doesn't look like it's just kinda hanging out up there by itself LOL 

Now add your copyright and now time for the name. 

For the name I used the font Lemondrop at 48 px. 
And the colors I used are in order - #f09378, #23ceff, #bf91c2, #da5f71, if the name you are using is longer just alternate those colors. 

I then put a stroke around the letters at 2 px. and 100% opacity with the color #e7dfcc.
Then I applied Inner Shadow like so: 


Then I applied the drop shadow like so: 


Position to your liking and then you're done! Thanks for checking out my tutorial! 
post signature

March 10, 2015

CT PTU "Taste of Italy" Tutorial


This Tutorial was written by me, any resemblance to another tutorial is completely unintentional. 
I am using Photoshop CS5 for this tutorial.
Tube
. You can find it at CDO and must
have a valid license to use it. 
Scrap Kit
"Taste of Italy" by Creative Scraps by Crys
Font
Volstead

Let's get started. 
Open a new canvas 650x650.
Now open the TIO_Frame_1 and drag into your blank canvas. 
 Re-size to your liking.
Now bring in TIO_Paper_3 and resize down to the size of the frame, positioning 
behind the frame.
 Use your magic wand tool to select the inside of the frame and then 
Select>Modify>Expand....6.
Select>Inverse, go back to the paper layer and then hit delete on your keyboard. 
.Bring in your tube and re-size and position to your liking. 

Now time for the elements: 
TIO_Element_1
TIO_Element_4
TIO_Element_5
TIO_Element_9
TIO_Element_16
TIO_Element_19
TIO_Element_28
TIO_Element_33
TIO_Element_46
TIO_Element_51
TIO_Element_62
TIO_Element_65
TIO_Element_67
TIO_Element_68
TIO_Element_69


place them to your liking and then use the drop shadow on them like this: 


Add your copyright and then it's time to do the  name. 
I used the font Volstead at 95 px. with the color #95311e. 
Then I added Stroke at 2 px., opacity 75%, and the color white. 
Then I did bevel and emboss like so: 


Then I added drop shadow to it like I did to the other elements. 
And that's it! TY for looking at my tutorial! 

post signature

February 20, 2015

PTU "Shake Your Shamrocks" Tutorial


This Tutorial was written by me, any resemblance to another tutorial is completely unintentional. 
I am using Photoshop CS5 for this tutorial.
Tube
Sexy Patty by Elias Chatzoudis
Scrap Kit
Shake Your Shamrocks by Creative Scraps by Crys 
Font
FTU font- Kells
Template
Template 506 by Millie's PSP Madness
Mask
MPM_Mask22

Lets get started! 
Open up your template and resize the largest side to 650. 
Bring in your close up and bring down above the Layer 3. 
Duplicate and position that above Layer 4. 
Hold down ALT as you click between the layer and the close up. Do the same for the 
original and Layer 3, so that they are cropped inside the circles. 
Duplicate the close up again, and drag so it is positioned above the Layer 5. 
Position to your liking, duplicate, flip horizontally, and then position to where there are no empty spaces inside the layer. 
Merge with the first layer and then hit ALT on your keyboard as you click between the template 
layer and the merged close up. 
Now you will want to create a gradient, I made my first one like so: 


With the colors #b4ce2b and #86639d.
Select the inside of your Layer 5 of the template with your magic wand 
and put your gradient across it. 
Now duplicate the merged close up layer. 
Filter >Blur > Gaussian Blur...6. 
Make that layer black and white and then make it have Screen for the blending mode. 
For the bottom layer, Luminosity blending mode. 
Now go back down to your Layer 3 of the template and create another gradient 
the same way as before but using the colors #f6ea5a and #445f0e.
magic wand and follow the steps as before, but don't make the duplicated layer
black and white.  
Duplicated layer- Screen blending mode
Main layer- Soft Light and lower opacity to 65%. 
Do the same to Layer 4. 

Now add your tube layer to your liking. 
Time to add the elements: 

SYS_Element_5
SYS_Element_8
SYS_Element_9
SYS_Element_11
SYS_Element_26
SYS_Element_30
SYS_Element_31
SYS_Element_32
SYS_Element_33
SYS_Element_38

Add your drop shadows to all layers but your tube like so: 


Use this drop shadow for your tube:

Now add your copyrights and then it's time to add the mask. 
I used the mask I stated above with the SYS_Paper_3. 
Then I smooshed (yes that's a word LOL) it down to fit the canvas... and then duplicated it. 

Now time to add the font! 

I used the font Kells at 60 px. with the color #b6d02f.
Then I made a stroke around it with black at 65% opacity. 
I did a Bevel and Emboss like so: 


And then the drop shadow as I did on the other elements. 
That's it!

Thank you for stopping by to check out my tutorial and I would love to see your results! 

post signature

January 20, 2015

PTU "Alice in Zombieland" Tutorial

This Tutorial was written by me, any resemblance to another tutorial is completely unintentional. 
I am using Photoshop CS5 for this tutorial.
Tube
Tube used was one of the elements found in the scrap kit.
Scrap Kit
Alice in Zombieland by Creative Scraps by Crys
Font
Army of Darkness
Template
Template 727mpm
Mask
WSL241, you can download it in bulk on the side of her blog HERE.
K let's get started.
First open up your template  and resize it with the largest side at 650 px. and then start with the papers. Here's what I used for each layer of the template:
Layer 9- AIZPaper_14
Layer7- AIZPaper_8
Layer 6- AIZPaper_10
Layers 5 & 4- AIZPaper_16
I merged Layers 3 & 2- AIZPaper_4
And for Layer 1- AIZPaper_17
With each paper, I simply positioned it above the layer I was using, and held down ALT as I clicked between the paper and layer. 
Now for the elements-
For the inside of Layer 9 I used AIZ Element_22, AIZElement_33, and AIZElement_52. Then I used the same method for the papers to crop them inside of the circle. 
As for the rest of the elements, here's what I used:
AIZElement_1
AIZElement_4
AIZElement_8
AIZElement_20
AIZElement_29
AIZElement_30
AIZElement_35
AIZElement_36
AIZElement_49
AIZElement_54
AIZElement_56
AIZElement_59
AIZElement_61
AIZElement_63, duplicated
AIZElement_64
AIZElement_69, duplicated
AIZElement_70, duplicated
I added a drop shadow to all elements and layers like so: 
Now for the mask, I used the AIZPaper_8 with the mask I stated above and made it into an 
oval shape, and then positioned it behind everything else.

For the name I used the font ArmyofDarkness, with the color white at 85 px.
Then I used the Layer Style Stroke with the color #980d0d, and then added a drop shadow like the one I used for the elements.
Now add your credits and there you are! 
Thanks for checking out my tutorial! 
post signature