This Tutorial was written by me, any resemblance to another tutorial is completely unintentional.
I am using Photoshop CS5 for this tutorial.
Tube
. I used the artwork of Tony T. I bought mine at PTE when it was still open,
but you can find it in his store HERE
Scrap Kit
"CSI" by Freek's Creations, found at Mystical Scraps
Font
Volstead & Heavyweight
Mask
WSL_Mask56
Now let's get started.
Open up a new canvas at 650x650.
No bring in Frame and resize to your liking.
Now bring in your close up of the tube, and position behind the frame.
Position to your liking and then duplicate it. Position that one on the other side
of the frame and merge them together.
Now, use your magic wand to select the inside of the frame, and then
Select>Modify> Expand...3.
Select> Inverse.
Hit delete with your keyboard to get rid of all the excess around the outside of the frame.
Duplicate it.
Select> Inverse and then create a new layer.
Make a gradient with your red and blue colors from the kit using your dropper tool.
Crop the entire thing to get rid of any strays that might still be hanging around.
The top duplicated close up you will want to Filter>Blur>Gaussian Blur...5.
Use the blending mode, Screen.
On the bottom on, use blending mode, Soft Light and then lower the opacity to 50%.
Now bring in your tube and position to your liking.
Now for the elements, I used the following:
Badge
Bow2
Bullet
Caution Tape
DNA1
DNA2
Equipment Case
Evidence Bag
Flower
Flower2
Gun
Handcuffs
Magnifying Glass
Plastic Bag
Police Lights
Print Powder
Team ID
Toe Tag
Vial
Now add drop shadows to all of the above, including your frame and tube, like so:
Now for the Detective Sexy Wording.
I used the font Heavyweight at 50 px. with the color #2f8bc9.
I used a stroke with white at 2px. and 100% opacity.
Then I did a bevel & emboss like so:
and then add a drop shadow like the other elements.
Now add your mask. I used the mask stated above with Paper8.
Add your copyright and license and then it's time to do the name last.
I used the font Volstead at 48px. with the color #c43421.
I used a black stroke at 1 px and 100% opacity.
Then I added my drop shadow.
Crop to your liking and you're done!
Thanks for checking out my tutorial!

This Tutorial was written by me, any resemblance to another tutorial is completely unintentional.
I am using Photoshop CS5 for this tutorial.
Tube
Happy Beer by Elias Chatzoudis. You can find it in his personal store and must
have a valid license to use it.
Scrap Kit
"Irish Charm" by Freek's Creations
Font
AuldMagick
Let's get started.
Open a new canvas 851x315.
Now open the Frame and drag into your blank canvas.
Re-size to your liking.
Duplicate it and then flip horizontally, position opposite of the original frame.
Merge them.
Use your magic wand tool to select the inside of the frames and then
Select>Modify>Expand....6.
Create a new layer under the frames and then create a gradient with the colors #f09441 & #19bc62.
Fill inside the marching ants.
Now Bring in your close up and position behind the frame.
Duplicate and move position each in one frame together.
Merge Down.
Duplicate the merged layer and place behind the other frame.
Select>Inverse, and then hit delete on your keyboard.
Duplicate each merged close up layer and then merge them into a single layer.
Select>Inverse and then Filter>Blur>Gaussian Blur...6.
Then Select None.
Blending mode on blurred layer- Screen
Blending mode on original close up- Soft Light
.Bring in your tube and re-size and position to your liking.
Now time for the elements:
Balloons_2
Banner
Cake
Calender
Coin
Flag
Flower
Flower_2
Harp
Hat
Rainbow
Ribbon_3
Whiskey
place them to your liking and then use the drop shadow on them like this, including the tube:
Add your copyright and then it's time to do the name.
I used the font AuldMagick at 95 px. with the color black.
Then I added Stroke like so:
Then I added drop shadow to it like I did to the other elements.
And that's it! TY for looking at my tutorial!
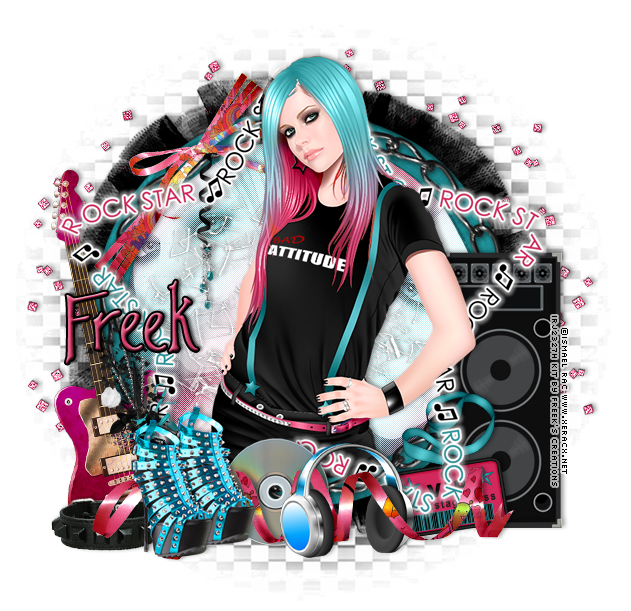
This Tutorial was written by me, any resemblance to another tutorial is completely unintentional.
I am using Photoshop CS5 for this tutorial.
Scrap Kit
"Rockstar" by Freek's Creations
Tube
I used the artwork of Ismael Rac. You must have a proper
license to use his artwork.
Font
DJB I Love a Ginger
Mask
WSL_98 (download the bulk file on the right of her blog)
Filters
VanDerLee>Unplugged-X
LenK's>Zitah
Let's get started!
Open up a new canvas at 650x650.
Drag your tube into the canvas.
Bring in Frame and Word Art from the kit and position all under the tube layer.
Click inside of the Frame and Select>Inverse.
Use your eraser tool to erase all of the tube on the outside of the marching ants on the bottom.
Now position the Word Art above the tube layer.
Go back to your tube layer and use your magic wand to click outside of the tube.
Select>Inverse.
Now go back to the word art once again and erase all that is over the tube's face and arm.
Now drag in your close up and position below all layers.
Position to your liking and then duplicate it.
Edit>Transform>Flip Horizontally
Position to your liking and then merge the two layers.
Now go back to your frame and click inside of it again.
Select>Modify>Expand....4
Select>Inverse.
Go down to the merged close up layer and hit delete with your keyboard.
Now hit Select>Inverse once again and create a new layer under the merged tube layer.
Create a gradient from your tube's clothing like so:
I used the colors #54bcc3 & #d83867
Fill the inside of your marching ants with this gradient and then go to your merged tube layer. Duplicate it.
Filters>Blur>Gaussian Blur>6.3
on the duplicated layer.
Monochrome the duplicated layer to black and white and then use Blending Mode- Screen
On the original layer use Blending Mode- Luminosity
Now use your filter VanDerLee>Unplugged-X> Pattern Offset...32
and then LenK's Zitah with the settings like so:
Select>Deselect
Now for the elements.
I used the following:
Backstage Pass
Bling (Duplicated 3 times)
Bow
Broken Glass
CD
Charm3
Flowers
Guitar
Headphones
Ribbon4 ( I removed the part of the ribbon that was over one side of the headphones)
Shoes
Speakers
add your drop shadow to all layers like so:
Now do your mask that I suggested above on Paper1 and duplicated it, and then put all of your correct copyright info on it and then crop it to your liking.
Now for the name-
I used the font DJB I Love a Ginger with the color #d63d6a at size 60 px.
Then I the stroke around it in black, size 2 px, 100% opacity.
Then I used Bevel and Emboss like so:
Add a drop shadow like I did with the other layers and then you're done!
I hope you enjoyed my tutorial and TY for stopping by!