
PSP version used: PSP X2
Supplies:
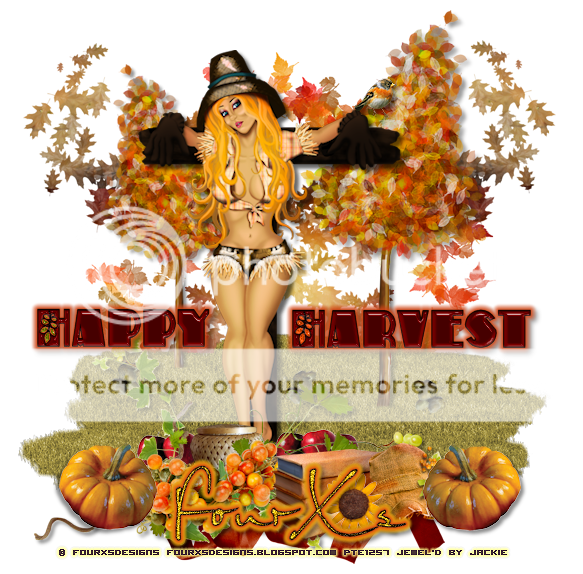
Tube of choice, I'm using the awesome newly released art work of FourXsDesigns that you can find at PSP Tubes Emporium. You must have proper license to use her tubes.
Scrap Kit of choice- I used Rustling Leaves by Darkmoon's Dream, and you can find that HERE.
Fonts- Autumn Deco and PetraScriptEF- both FTU
Filters:
Xero> Radiance
Lokas Software> Gel
Eye Candy> Gradient Glow
DSB Flux> Bright Noise
Xero> Radiance
Lokas Software> Gel
Eye Candy> Gradient Glow
DSB Flux> Bright Noise
Now lets do this! :P
Open up a new canvas as 600x600.
Open up your full tube- resize 90%, copy and paste onto main canvas, drop shadow- 4, 4, 45, 5.00.
Duplicate, Effects> Radiance with these settings:

Opacity 60%
Open up your tree- resize 50%, copy and paste behind tube. Position where you want it.
Duplicate, Image-Mirror. Resize- 80% Position where you want it. Drop shadow on both.
Open Leaves03, resize- 60%, copy and paste, place behind everything. Duplicate, Image>Mirror.
Open Leaves02- resize 50% place behind trees.
New Raster Layer-
Select Picture tube tool, and choose Grass 01.
 Place grass randomly so it looks like it's behind the tube.
On the grass- Adjust> Hue and Saturation> Colorize
I used Hue 36, Saturation 105
Open pumpkin element, free rotate> right, 10.00, Resize- 40%, place where ya want.
Duplicate> Mirror. Drop shadow on both, 2,2, 45, 5.00.
Branch02, copy and paste behind the pumpkins. Drop shadow.
Hat02, resize 40% postion behind pumpkin. Drop shadow.
Ribbon01, resize 50% copy and paste.
Books resize- 30% copy and paste between branch and hat. Drop shadow.
Flower02, resize-15%. copy and paste. Drop shadow.
Acorns02, resize- 10%, free rotate- left, 30.00. copy and paste. Duplicate a couple of times, mirror one and place around on the grass layer.
Bird, resize 12%, Adjust> Sharpness> Sharpen, copy and paste.
Basket, resize 20%, copy and paste in front of tube layer. Drop shadow.
Apples, resize 20%, copy and paste. Duplicate, Mirror, adjust so it can be seen.
Now for our text: I use Autumn Deco Font for the Happy Harvest at size 55. Then I zoomed in and colored the leaves yellow and orange.
I used Lokas Software> Gel like this:

Then I used Eye Candy 4000> Gradient Glow> Medium, in an orange color with these settings:
Glow Width 6, Soft Corners 25, Opacity 100. Drop shadow.
Now write the name in PetraScriptEF, in yellow. Convert to Raster Layer, DSB Flux> Bright Noise- Mix 60.
Eye Candy 4000> Gradient Glow. Same settings as above, and then do it again with these settings- 4.00, 25, 100 with yellow.
Drop shadow.
Crop.
Now add your copyright and watermark, and you're done! Hope you enjoyed my tutorial! Thanks for stopping by, and I'd love to see your results! :)
Open up your full tube- resize 90%, copy and paste onto main canvas, drop shadow- 4, 4, 45, 5.00.
Duplicate, Effects> Radiance with these settings:
Opacity 60%
Open up your tree- resize 50%, copy and paste behind tube. Position where you want it.
Duplicate, Image-Mirror. Resize- 80% Position where you want it. Drop shadow on both.
Open Leaves03, resize- 60%, copy and paste, place behind everything. Duplicate, Image>Mirror.
Open Leaves02- resize 50% place behind trees.
New Raster Layer-
Select Picture tube tool, and choose Grass 01.
On the grass- Adjust> Hue and Saturation> Colorize
I used Hue 36, Saturation 105
Open pumpkin element, free rotate> right, 10.00, Resize- 40%, place where ya want.
Duplicate> Mirror. Drop shadow on both, 2,2, 45, 5.00.
Branch02, copy and paste behind the pumpkins. Drop shadow.
Hat02, resize 40% postion behind pumpkin. Drop shadow.
Ribbon01, resize 50% copy and paste.
Books resize- 30% copy and paste between branch and hat. Drop shadow.
Flower02, resize-15%. copy and paste. Drop shadow.
Acorns02, resize- 10%, free rotate- left, 30.00. copy and paste. Duplicate a couple of times, mirror one and place around on the grass layer.
Bird, resize 12%, Adjust> Sharpness> Sharpen, copy and paste.
Basket, resize 20%, copy and paste in front of tube layer. Drop shadow.
Apples, resize 20%, copy and paste. Duplicate, Mirror, adjust so it can be seen.
Now for our text: I use Autumn Deco Font for the Happy Harvest at size 55. Then I zoomed in and colored the leaves yellow and orange.
I used Lokas Software> Gel like this:
Then I used Eye Candy 4000> Gradient Glow> Medium, in an orange color with these settings:
Glow Width 6, Soft Corners 25, Opacity 100. Drop shadow.
Now write the name in PetraScriptEF, in yellow. Convert to Raster Layer, DSB Flux> Bright Noise- Mix 60.
Eye Candy 4000> Gradient Glow. Same settings as above, and then do it again with these settings- 4.00, 25, 100 with yellow.
Drop shadow.
Crop.
Now add your copyright and watermark, and you're done! Hope you enjoyed my tutorial! Thanks for stopping by, and I'd love to see your results! :)
No comments:
Post a Comment